|
Basic Image Prep with Fireworks
Start by launching Fireworks from the Dock. You will notice that there is no "blank document" that is opened for your to begin working with. That is because Fireworks is chiefly used for working with images that already exist and not creating them from scratch (although it can do this). In order to start working with Fireworks, you will need an existing image. Click on the image below to download a larger bitmap version of the picture.
The link should download a zip archive to the desktop. Archives provide
a way to compress files (or groups of files) so that they do not
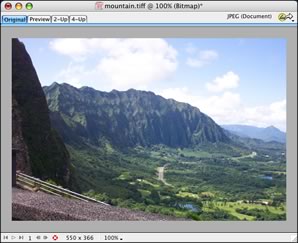
take as long to download. If you double-click on the Once you have saved it to a new location, go back to Fireworks and choose Open from the File menu. You should be able to find the file and open it within Fireworks. You can also drag the icon for the file to the Fireworks icon in the dock and open it that way. This last option is this best way to ensure that a file opens with a specific application. You should now see it open in a window like this:
You should notice a few things about the window:
The first thing you need to do is save the picture in Fireworks preferred file format, PNG (which stands for Portable Network Graphics). Again, this file will not be posted to your web site, so keep it separate from those files going on the server. Select Save from the File menu to do this. Now you are ready to manipulate the image. We are going to perform a simple crop of the image, selecting a portion to view and then throwing away the rest. Again, Fireworks can do much more than this. If you are interested, check out the online help or just play around with it.
Once it is engaged, go back to the picture window and click and drag. When you release the mouse, you will see that a box has surrounded the area that you covered. If you have trouble with this, try it out a few times until it feels natural. Each time you perform this motion, your selection will be replaced by a new selection. So if you mess up, there is no need to undo; simply click and drag again. The magnification can also be helpful to make sure to get exactly the part of the picture you are after. If you find it hard to get exactly the part you are after and nothing more, try increasing the magnification before making your selection.
Once you have the portion that you are satisfied with, go to the Edit menu and click Crop Document. If you are happy with the results, go ahead and save the file. If not, go to the Edit menu and click Undo (or use apple-Z). Try it again until you are happy with the cropped image. Once you are satisfied with the results, save the file to make sure you don't lose the changes you've made. Now you are ready to export this picture for use on your web page. This is where Fireworks really shines. Go to the File menu and click on Export Preview. A window will appear that looks like this:
The screen is divided into two panels. The one on the left is used to alter the format of your graphic file. The one on the right is an interactive preview, showing you how the choices you've made on the left will affect the final product for your web page. In other words, you are able to see the how your changes to the export options will look when the picture is put on your web page. This can be a very handy and time saving feature. The first item you should notice about the right panel is the information listed at the top. It tells you the format of your file, how big it is in terms of kilobytes, and approximately how long it would take someone with a modem to download this image. This information will be updated as you make changes to your settings. Coupled with the preview window, you can decide very quickly if the changes you have made to save the user three seconds of download time are worth the sacrifice in image quality that comes with those changes. Right now, you should see that the TIFF format your mountain picture is in would take over 40 seconds to download. That's way too long! So click on the format menu in the left panel and choose JPEG. What happened to the time? You should notice that it has dropped significantly. With the JPEG option selected, you will now see some additional options in the left panel. Play with the quality value. If you click and drag on the down arrow next to the number and it will reveal a slider that you can use to make adjustments. When you let go of the mouse, the image will update. How low can you set the number before you start to notice the effects on the image? Keep in mind that the results will be different for each image, so you will have to test each time you use the software. Play with the other options and see what effect they have. Some may be more subtle than others, but you can be the ultimate judge of what to use by observing the preview and watching the download time.
Note that this is a completely new file. Fireworks maintains your original at full resolution. If you change your mind later about the image, you can go back to the original PNG file and perform a new export using a different web file format or scale the image again to make it larger or smaller. Because it is maintaining the original as a separate file, do not be surprised when Fireworks asks you to save your changes after you just exported a file. Go through the images you want to place on your web page and use Fireworks to crop and scale them. Having appropriately sized images without a lot of dead space in them can make your web page much more readable and appealing to visitors.
It is a very good idea to keep this figure as low as possible. The quicker your web page loads, the less time your visitors will spend waiting. Anything over 20 seconds and your visitor may give up on the page before it finishes loading. Wouldn't you? |
 Fireworks
is an application by the same company that makes Dreamweaver. Because of
this, you find that a lot of the interface elements are similar. Fireworks
is really meant to complement Dreamweaver as a tool for preparing your images
to be used on the web. It can read a lot of different file formats and convert
these into other formats ready for the web, including
Fireworks
is an application by the same company that makes Dreamweaver. Because of
this, you find that a lot of the interface elements are similar. Fireworks
is really meant to complement Dreamweaver as a tool for preparing your images
to be used on the web. It can read a lot of different file formats and convert
these into other formats ready for the web, including 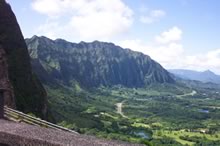
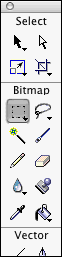 Go to
the Tools palette on the left end of your screen. If it is not there, go
to the Window menu and make sure that the Tools option
is checked. The option on the left of the third row (just below the word "Bitmap")
is the Marquee tool. Click here to make sure it is engaged like the picture
to the left.
Go to
the Tools palette on the left end of your screen. If it is not there, go
to the Window menu and make sure that the Tools option
is checked. The option on the left of the third row (just below the word "Bitmap")
is the Marquee tool. Click here to make sure it is engaged like the picture
to the left.  Now,
you will notice that our picture includes a guard rail at the bottom. We
would like to eliminate that from the picture so that we have a clear, unobstructed
view of the mountain. Go ahead a select a portion of the image that doesn't
include the guard rail.
Now,
you will notice that our picture includes a guard rail at the bottom. We
would like to eliminate that from the picture so that we have a clear, unobstructed
view of the mountain. Go ahead a select a portion of the image that doesn't
include the guard rail.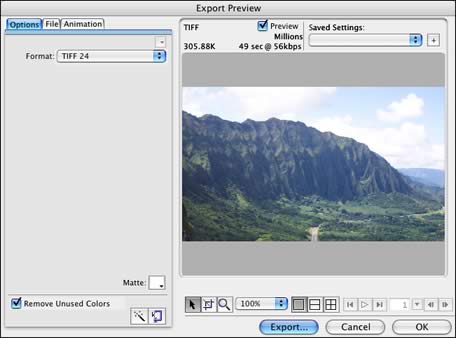
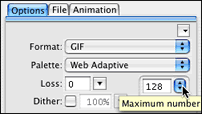 Next
change the format option to GIF. Did you notice a change
in the photo? If not, try reducing the number of colors used in the photo
with the palette size option in the left panel, at the end of the third row
in that panel. How much can you reduce this number before it starts to seriously
degrade the image? Again, play with the other options, taking note of how
they affect
the image quality and file size.
Next
change the format option to GIF. Did you notice a change
in the photo? If not, try reducing the number of colors used in the photo
with the palette size option in the left panel, at the end of the third row
in that panel. How much can you reduce this number before it starts to seriously
degrade the image? Again, play with the other options, taking note of how
they affect
the image quality and file size. If
you need to resize the image to make it smaller or larger, you do that as
well. Click on the File tab at the top of the left panel,
then click and drag the down arrow next to the percent value. When you release
the slider, the image will change its size in the preview window. Note that
this is the actual size that the image will be for your web page and
not simply a zoom feature for viewing. Decreasing the size will work
better than increasing the size in terms of maintaining the image quality.
If
you need to resize the image to make it smaller or larger, you do that as
well. Click on the File tab at the top of the left panel,
then click and drag the down arrow next to the percent value. When you release
the slider, the image will change its size in the preview window. Note that
this is the actual size that the image will be for your web page and
not simply a zoom feature for viewing. Decreasing the size will work
better than increasing the size in terms of maintaining the image quality.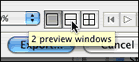 If
you have trouble deciding between a GIF or JPEG (or any format differences),
you can use the split preview feature. The buttons used to activate this
feature are just above the Export button. Click on the 2
preview option and you can now compare the image quality and file size of
two different sets of options. The panel on the left will display and control
the settings for which ever preview you last clicked on. Try setting up the
split view with a GIF in one and a JPEG in the other. Now you don't have
to remember the difference between them, because it is right there on screen
for you to compare.
If
you have trouble deciding between a GIF or JPEG (or any format differences),
you can use the split preview feature. The buttons used to activate this
feature are just above the Export button. Click on the 2
preview option and you can now compare the image quality and file size of
two different sets of options. The panel on the left will display and control
the settings for which ever preview you last clicked on. Try setting up the
split view with a GIF in one and a JPEG in the other. Now you don't have
to remember the difference between them, because it is right there on screen
for you to compare.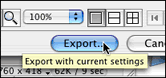 Once
you have decided on a format that you like (again in terms of image quality
and file size), click the Export button. If you are using
a split view, make sure you click on the version you want to use before exporting.
This will open a save dialog for you. Be sure to save this file with the
rest of your web page files. For our mountain example, you should have created
something like this (without that pesky rail at the bottom):
Once
you have decided on a format that you like (again in terms of image quality
and file size), click the Export button. If you are using
a split view, make sure you click on the version you want to use before exporting.
This will open a save dialog for you. Be sure to save this file with the
rest of your web page files. For our mountain example, you should have created
something like this (without that pesky rail at the bottom):
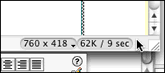 By
the way, after all this talk of checking the file sizes to make sure your
web page loads quickly, I should probably point out that Dreamweaver has
a similar feature. Next time you are in Dreamweaver, look at the bottom right
corner of the design window. The first number
tells you the total amount of memory used by the files on your web page.
The second gives you an approximation of how long it will take to load in
a browser.
Notice
I said this was a total figure. Dreamweaver actually looks at all the pictures
(and other media) embedded in your web page and adds up their individual
file sizes. It then uses this total to compute the download time.
By
the way, after all this talk of checking the file sizes to make sure your
web page loads quickly, I should probably point out that Dreamweaver has
a similar feature. Next time you are in Dreamweaver, look at the bottom right
corner of the design window. The first number
tells you the total amount of memory used by the files on your web page.
The second gives you an approximation of how long it will take to load in
a browser.
Notice
I said this was a total figure. Dreamweaver actually looks at all the pictures
(and other media) embedded in your web page and adds up their individual
file sizes. It then uses this total to compute the download time.