|
Getting Started with Max/MSP
 This tutorial
will introduce you to Max/MSP, a graphical programming environment for music
(as well as video and multimedia and other things). It will introduce you
to terminology and walk you through the creation of your first patch.
As part of this process you will learn basic techniques and conventions that
are used to program in Max/MSP. This tutorial
will introduce you to Max/MSP, a graphical programming environment for music
(as well as video and multimedia and other things). It will introduce you
to terminology and walk you through the creation of your first patch.
As part of this process you will learn basic techniques and conventions that
are used to program in Max/MSP.
Max/MSP is currently
maintained and sold by Cycling'74 and
is available for both the MacOS and Windows. Although this tutorial describes
the Mac version, most of the information will be easily transferable to
the Windows version (things like keystrokes will exhibit the most obvious
differences). Demo versions are available for both platforms along with
extensive documentation.
This tutorial is not a replacement for that documentation, only a condensed
overview meant to give you a quick-start with the software.
When you launch Max/MSP, you should see the following window appear on your
screen:
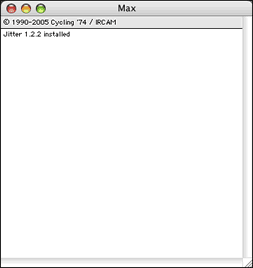
This is called the Max window. Do not confuse
this with the program itself, which is called Max/MSP. The window is used
by the program
to communicate messages to you. These messages may convey errors, progress
updates, file loading and other things. You can even program Max to post
message to this window yourself, something this tutorial will teach you to
do.
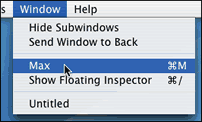 If the
window is missing, you can open it again by going to the Window menu
and selecting the Max option. You may also open the window
by pressing apple + M on your keyboard. This keystroke will
also bring the window to the front if it gets lost beneath other windows,
something that will inevitably happen as you start to build more complicated
patches with Max/MSP. If the
window is missing, you can open it again by going to the Window menu
and selecting the Max option. You may also open the window
by pressing apple + M on your keyboard. This keystroke will
also bring the window to the front if it gets lost beneath other windows,
something that will inevitably happen as you start to build more complicated
patches with Max/MSP.
Is important to note that error messages in Max/MSP will not produce
individual pop-up windows like most other software. They are instead simply
posted to the Max window. For this reason, you should get in the habit of
checking this windows whenever you think something is going wrong with your
patch, because the program may be trying to tell you something. The messages
will be a single line of text describing the problem that was encountered,
that may help you diagnose the situation. If you do not check the Max window,
you might never discover why something is
not
working.  The basic
type of file that Max/MSP uses is called a patch or patcher.
If you are starting a new project, you will need to first create a blank
patch to begin creating your program. To do this, go to the File menu,
in the New submenu you should click on the option for Patcher.
Note that you may also use the common apple + N keystroke
to create a new, blank patcher. In either case, a window should appear
that looks like this: The basic
type of file that Max/MSP uses is called a patch or patcher.
If you are starting a new project, you will need to first create a blank
patch to begin creating your program. To do this, go to the File menu,
in the New submenu you should click on the option for Patcher.
Note that you may also use the common apple + N keystroke
to create a new, blank patcher. In either case, a window should appear
that looks like this:
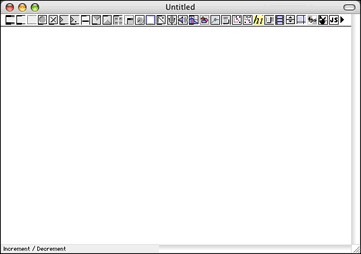
This is where you will be programming your Max patch. Notice that it in
addition to the typical title bar found on most windows, it also has what
is called a toolbar or palette.
This toolbar lets you drop elements into your patch, which can then be combined
to form your program.
Most of
your work will require just the first seven items in this toolbar, which
are magnified here and described individually. If the following descriptions
seem confusing, keep reading because the section on connecting objects that
follows should clarify things.

- object box - This item is used more often than
any of the other items in the toolbar. Object boxes allow the user to invoke
a variety of functions or tasks. The user determines the specific
function that is performed by typing an
identifying
name
into the box. More about that process in a moment.
- message box - This is likely the second most
used item in the toolbar. Objects communicate with each other by passing
messages. This item allows the user to construct his or her own messages.
These messages can contain words and numbers and combinations of the two.
The messages can then be used to cause objects to perform specific actions.
- comment box - This item should be used far
more often that it often is. Text added to a comment has absolutely
no effect on the program you create in Max/MSP, but it serves an important
purpose. The text can be used to document elements of your patch and describe
what they do. Think of them as notes to your future self (or your professor).
- bang button - The "bang" message has special
meaning in Max/MSP. It is used by many objects and gets translated as "do
something now!" The bang button is a simple item that outputs one of
these "bang" messages whenever the user clicks on it with the mouse. It
provides a basic way to create interactivity so that your patch does something
in response to a mouse click.
- toggle button - This item acts as a switch
when you click on it with the mouse. When checked, an X appears in the
box and it outputs the number 1. When unchecked, the X disappears and
it outputs the number 0. When connected to certain objects, in can turn
activities on and off.
- integer number box - This item allows the user
to see changes in the number messages being passed between objects. It
can also be used to input change using either the keyboard or by clicking
and dragging with the mouse. It is restricted to integers, also known as
whole numbers.
- floating point number box - A cousin to the
previous item. This one will handle numbers with decimal points and
fractional values they provide. When clicking and dragging this one, positioning
matters. Click on the left of the decimal point and the whole number portion
is changed. Click on the right of the decimal point and the fractional
portion is changed.
 Now that
we have covered these toolbar items, let's put them to use. You can add any
one of these items to your patch using your mouse. Start by clicking on the
object box. You only have to provide a single click, and not a click and
drag action. When you move the cursor down into the white space, you should
notice that it is now shaped like the icon from the toolbar. This will occur
for al of the palette items and will help remind you what item you are about
to add to your patch. Now that
we have covered these toolbar items, let's put them to use. You can add any
one of these items to your patch using your mouse. Start by clicking on the
object box. You only have to provide a single click, and not a click and
drag action. When you move the cursor down into the white space, you should
notice that it is now shaped like the icon from the toolbar. This will occur
for al of the palette items and will help remind you what item you are about
to add to your patch.
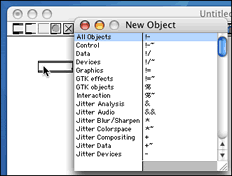 Click again anywhere in the white
space. You will see a blank object box is added to your patch. In addition,
a floating window appears that will list the available objects. If you do
not see the list, go to the Options menu and make sure that
the New Object List option is checked. If it was not checked,
repeat the process of adding an object box to your patch and you should now
see it. Click again anywhere in the white
space. You will see a blank object box is added to your patch. In addition,
a floating window appears that will list the available objects. If you do
not see the list, go to the Options menu and make sure that
the New Object List option is checked. If it was not checked,
repeat the process of adding an object box to your patch and you should now
see it.
The first column groups object names into categories,
making it easier to find objects that have similar functions or work
together. The list in the right column will change depending on the category
selected in the first column. The first option in this column is called "All
Objects"
and provides a complete list
of objects
in
the right
column. Take
a minute to peruse this list and get an feel for just how many different
functions
are available to you. These are the names of available object for your installed
copy of Max/MSP. When choosing objects to work with, only these words will
be recognized. If you type something into an object box that Max does not
recognize, you will see an error posted in the Max window.
When you are done checking out the list, return the left column to the first
option and use the scroll bar to find a object named "print" in
the right column. When you see it, double
click
the word. You
will notice that Max fills the word into the object box for you as the
new object list disappears.
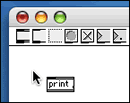 After
the word has been placed in the object box, you should notice that there
is still a blinking cursor in the box. This is because you can still
type to add arguments to the object (these are
like options, but more on that later). In order to finalize the addition
of this object to your patch, you will need to click again anywhere in the
white space surrounding it. Hitting return on the keyboard may be
your natural inclination to finish adding the object, but be aware that it
will not finalize your addition to the patch. Only clicking in the white
space
will
work. After
the word has been placed in the object box, you should notice that there
is still a blinking cursor in the box. This is because you can still
type to add arguments to the object (these are
like options, but more on that later). In order to finalize the addition
of this object to your patch, you will need to click again anywhere in the
white space surrounding it. Hitting return on the keyboard may be
your natural inclination to finish adding the object, but be aware that it
will not finalize your addition to the patch. Only clicking in the white
space
will
work.
After this, the cursor should disappear and a
small black band will appear on the top of the object box. This band is
called an inlet and acts as a connection point
between objects. But before we can do that, we need a second item.
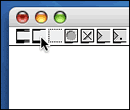 Return
to the toolbar and click on the message box. You should again notice that
as you move the cursor back into the white space, the cursor has changed
to the shape of the message box icon. Click above the "print" object you
have already created to place the message box in your patch. You will see
a blank message box with a blinking cursor. Unlike the object box, a message
can contain any text so there is no list allowed messages that pops up like
there was when you added an object. Return
to the toolbar and click on the message box. You should again notice that
as you move the cursor back into the white space, the cursor has changed
to the shape of the message box icon. Click above the "print" object you
have already created to place the message box in your patch. You will see
a blank message box with a blinking cursor. Unlike the object box, a message
can contain any text so there is no list allowed messages that pops up like
there was when you added an object.
 While
the cursor is still blinking, go ahead and type a message
into the box. For the purpose of my demonstration, I will type in the word
"hello". However, your message can be something different if you would like,
even something that is several words long or that includes numbers. Basically,
anything you can type at the keyboard, a message box will hold it. While
the cursor is still blinking, go ahead and type a message
into the box. For the purpose of my demonstration, I will type in the word
"hello". However, your message can be something different if you would like,
even something that is several words long or that includes numbers. Basically,
anything you can type at the keyboard, a message box will hold it.
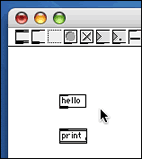 When you
are done typing, click in the white space to finalize your addition to
the patch. Again, you instinct will be to hit return on the keyboard, but
this will not work. You must click outside the box in the white space. When you
are done typing, click in the white space to finalize your addition to
the patch. Again, you instinct will be to hit return on the keyboard, but
this will not work. You must click outside the box in the white space.
You will notice that the message box you just created has a small black
band on the bottom and top of its box. Just like the object box, the band
on the
top is called an inlet. The band on the bottom
is called an outlet. Items inside a Max/MSP patch
communicate with one another through connections made between outlet and
inlet. The number of inlets and outlets will vary on each type of item, depending
on the function that it performs. The mouse is used to determine the exact
manner in which items are connected using patchcords.
Connections are always initiated at the outlet and terminated at the inlet.
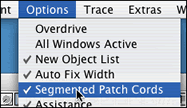 Before we begin making connection, this tutorial will assume that you have
the "segmented patch cords" option enabled. You can see if this feature is
turned on by going to the Options menu and looking for the Before we begin making connection, this tutorial will assume that you have
the "segmented patch cords" option enabled. You can see if this feature is
turned on by going to the Options menu and looking for the
Segmented
Patch Cords option. WIthout first enabling this feature, some of
the mouse click directions that follow will not work as described.
 Start
by moving your mouse cursor over the lone outlet on the message box. You
will notice that it "grows" when the cursor is in close proximity. While
the outlet is extended, click the mouse then move your cursor away from the
outlet. You should a line that is now connecting the outlet to the mouse
cursor. This is a patchcord and it will follow
your cursor until to terminate it at the desired inlet. Start
by moving your mouse cursor over the lone outlet on the message box. You
will notice that it "grows" when the cursor is in close proximity. While
the outlet is extended, click the mouse then move your cursor away from the
outlet. You should a line that is now connecting the outlet to the mouse
cursor. This is a patchcord and it will follow
your cursor until to terminate it at the desired inlet.
 Move the
cursor to the inlet on the print object. You will notice that it now "grows"
to meet the cursor. This lets you know that you are able to make a valid
connection between this inlet and the outlet where your patchcord originated.
To finalize your connection, click the mouse while your cursor is over the
inlet. If the cord continues to follow your cursor, you have missed the inlet.
If you hold down the apple key and click
anywhere in the white space, your patchcord will disappear and you can start
again. If the cord no longer follows your cursor, then you have successfully
made your first
patch
connection. Move the
cursor to the inlet on the print object. You will notice that it now "grows"
to meet the cursor. This lets you know that you are able to make a valid
connection between this inlet and the outlet where your patchcord originated.
To finalize your connection, click the mouse while your cursor is over the
inlet. If the cord continues to follow your cursor, you have missed the inlet.
If you hold down the apple key and click
anywhere in the white space, your patchcord will disappear and you can start
again. If the cord no longer follows your cursor, then you have successfully
made your first
patch
connection.
Believe it or not, these two objects also form a simple, yet functioning
patch. With this patch, you can print your message into the Max window. In
order to use the patch however, you must "lock" it first.
Patchers have two states: locked and unlocked.
In order to edit a patch as we have been doing, it must be in an unlocked
state. New patchers will default to this state when they are created. When
unlocked, the palette or toolbar is visible, so if you see that row of items
at the top of your patch, you know it is unlocked.
 To lock
a patch, go to the upper right corner and click on the white oval button.
Notice that the palette icons at the top of your patch window disappear.
You may also notice the they look of your message box and object box have
also changed. Beginners (and occasionally
some advanced users) inevitably get tripped up because they thing a patch
is locked when it is not , and vice versa. Take some time to become accustomed
to these visual differences between these two states, perhaps unlocking and
locking you patch a few times. To lock
a patch, go to the upper right corner and click on the white oval button.
Notice that the palette icons at the top of your patch window disappear.
You may also notice the they look of your message box and object box have
also changed. Beginners (and occasionally
some advanced users) inevitably get tripped up because they thing a patch
is locked when it is not , and vice versa. Take some time to become accustomed
to these visual differences between these two states, perhaps unlocking and
locking you patch a few times.
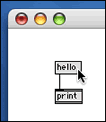 Once
the patch is locked, move the mouse cursor back to your message box and click
on it. Because of the patchcord connected between them, this action causes
the text contained in the message box to be forwarded to the print object.
The print
object
will then take that message and perform its designated action, namely printing
the text into the Max window. If you look at your Max window, you should
see something like this: Once
the patch is locked, move the mouse cursor back to your message box and click
on it. Because of the patchcord connected between them, this action causes
the text contained in the message box to be forwarded to the print object.
The print
object
will then take that message and perform its designated action, namely printing
the text into the Max window. If you look at your Max window, you should
see something like this:
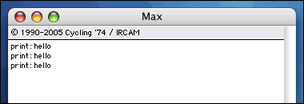
Your message will be printed to the Max window once for every time that
you click on the message box. Congratulations! You have just programmed
your first Max/MSP patch. Admittedly it is very simple, but pretty much everyone
starts out with this same exercise.
In this tutorial you were introduced to the basic terminology used for
Max/MSP programming. You learned about the Max window and
its role (displaying messages). You learned the basic mechanics used to program
a patcher, as well as the difference between object boxes and message boxes.
A future tutorial will cover more of those first
seven items in the palette. Happy max-ing!
|
 This tutorial
will introduce you to Max/MSP, a graphical programming environment for music
(as well as video and multimedia and other things). It will introduce you
to terminology and walk you through the creation of your first patch.
As part of this process you will learn basic techniques and conventions that
are used to program in Max/MSP.
 If the
window is missing, you can open it again by going to the Window menu
and selecting the Max option. You may also open the window
by pressing apple + M on your keyboard. This keystroke will
also bring the window to the front if it gets lost beneath other windows,
something that will inevitably happen as you start to build more complicated
patches with Max/MSP.
 The basic
type of file that Max/MSP uses is called a patch or patcher.
If you are starting a new project, you will need to first create a blank
patch to begin creating your program. To do this, go to the File menu,
in the New submenu you should click on the option for Patcher.
Note that you may also use the common apple + N keystroke
to create a new, blank patcher. In either case, a window should appear
that looks like this:

 Now that
we have covered these toolbar items, let's put them to use. You can add any
one of these items to your patch using your mouse. Start by clicking on the
object box. You only have to provide a single click, and not a click and
drag action. When you move the cursor down into the white space, you should
notice that it is now shaped like the icon from the toolbar. This will occur
for al of the palette items and will help remind you what item you are about
to add to your patch.
 Click again anywhere in the white
space. You will see a blank object box is added to your patch. In addition,
a floating window appears that will list the available objects. If you do
not see the list, go to the Options menu and make sure that
the New Object List option is checked. If it was not checked,
repeat the process of adding an object box to your patch and you should now
see it.
 After
the word has been placed in the object box, you should notice that there
is still a blinking cursor in the box. This is because you can still
type to add arguments to the object (these are
like options, but more on that later). In order to finalize the addition
of this object to your patch, you will need to click again anywhere in the
white space surrounding it. Hitting return on the keyboard may be
your natural inclination to finish adding the object, but be aware that it
will not finalize your addition to the patch. Only clicking in the white
space
will
work.
 Return
to the toolbar and click on the message box. You should again notice that
as you move the cursor back into the white space, the cursor has changed
to the shape of the message box icon. Click above the "print" object you
have already created to place the message box in your patch. You will see
a blank message box with a blinking cursor. Unlike the object box, a message
can contain any text so there is no list allowed messages that pops up like
there was when you added an object.
 When you
are done typing, click in the white space to finalize your addition to
the patch. Again, you instinct will be to hit return on the keyboard, but
this will not work. You must click outside the box in the white space.
 Before we begin making connection, this tutorial will assume that you have
the "segmented patch cords" option enabled. You can see if this feature is
turned on by going to the Options menu and looking for the
  Start
by moving your mouse cursor over the lone outlet on the message box. You
will notice that it "grows" when the cursor is in close proximity. While
the outlet is extended, click the mouse then move your cursor away from the
outlet. You should a line that is now connecting the outlet to the mouse
cursor. This is a patchcord and it will follow
your cursor until to terminate it at the desired inlet.
 To lock
a patch, go to the upper right corner and click on the white oval button.
Notice that the palette icons at the top of your patch window disappear.
You may also notice the they look of your message box and object box have
also changed. Beginners (and occasionally
some advanced users) inevitably get tripped up because they thing a patch
is locked when it is not , and vice versa. Take some time to become accustomed
to these visual differences between these two states, perhaps unlocking and
locking you patch a few times.
 Once
the patch is locked, move the mouse cursor back to your message box and click
on it. Because of the patchcord connected between them, this action causes
the text contained in the message box to be forwarded to the print object.
The print
object
will then take that message and perform its designated action, namely printing
the text into the Max window. If you look at your Max window, you should
see something like this: