|
Getting Started with Sibelius
 This tutorial will introduce Sibelius, an application used for music notation.
Think of it a kind of "MS Word for music". Using this software, you can create
scores for a variety of musical ensembles that are ready to print and use.
It also features that let you preview how your score will sound and even publish
it to the web (more on these in future tutorials). Start by launching Sibelius
from the Dock (see picture). This tutorial will introduce Sibelius, an application used for music notation.
Think of it a kind of "MS Word for music". Using this software, you can create
scores for a variety of musical ensembles that are ready to print and use.
It also features that let you preview how your score will sound and even publish
it to the web (more on these in future tutorials). Start by launching Sibelius
from the Dock (see picture).
When you start up the program, you will first see a splash screen with details
about the software. Next, you may see a window like this one:
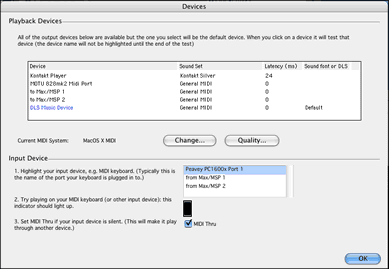
This window is used to configure the MIDI devices that Sibelius will use
to turn your score into sound. We do not need to change any of the settings
in here just yet, so if it does appear go ahead and click the OK button
in the bottom right corner.
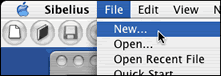 The first
thing you will probably want to do is create a new score. This can be accomplished
by clicking New in the File menu
or by pressing apple+N. When you do this, Sibelius does
not just give you a blank page to configure. A small window opens that will
ask you a series of questions about your score so
that most of the details are taken care of before you compose a single note. The first
thing you will probably want to do is create a new score. This can be accomplished
by clicking New in the File menu
or by pressing apple+N. When you do this, Sibelius does
not just give you a blank page to configure. A small window opens that will
ask you a series of questions about your score so
that most of the details are taken care of before you compose a single note.
 The questions
are presented through a series of 5 panels in this window. Once you are satisfied
with the settings on the current panel, press the Next> button
to continue. If you want to skip the remaining panels, leaving them in
a default state, you may click the Finish button at any
time and Sibelius will open your new score. The questions
are presented through a series of 5 panels in this window. Once you are satisfied
with the settings on the current panel, press the Next> button
to continue. If you want to skip the remaining panels, leaving them in
a default state, you may click the Finish button at any
time and Sibelius will open your new score.
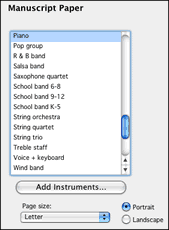 The
first panel asks you for the basic instrumentation you would like to
start with. There are a number of common types of music ensembles available
to you in the menu, each containing a preformatted list of instruments
found in that ensemble. Even if you do not see an option that suits the
particular piece you will
be
writing,
selecting
one of
these
as a
starting
point is still a good idea. You can easily add and subtract instruments
by using the Add Instruments button or once you start
editing your score. The
first panel asks you for the basic instrumentation you would like to
start with. There are a number of common types of music ensembles available
to you in the menu, each containing a preformatted list of instruments
found in that ensemble. Even if you do not see an option that suits the
particular piece you will
be
writing,
selecting
one of
these
as a
starting
point is still a good idea. You can easily add and subtract instruments
by using the Add Instruments button or once you start
editing your score.
Below this, you will see options for your printer's paper
size and the orientation. As you make changes to any of these, you will
notice the preview window to the right is updates to give you a glimpse
at how you score will look.
 Once
you have settled on a set of option you are happy with, go ahead and
click the Next> button. If you decide you need to
go back for any reason, feel free to press the <Previous button
and make any changes. Once
you have settled on a set of option you are happy with, go ahead and
click the Next> button. If you decide you need to
go back for any reason, feel free to press the <Previous button
and make any changes.
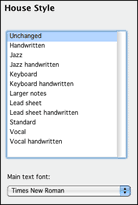
The next page sets up something called the "House Style". In a sense,
this is like the font for your music score. It will change the look of
the music notes and other elements in your score, something that is difficult
to judge in the small preview window. If you are unhappy with changes
you make here, don't worry, they can be corrected later.
Below this you will see an option for the font used for text in your
score. If you don't like "Times New Roman", here's the place you can
change it. When you are done with this panel, click Next>.
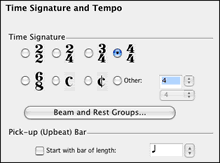 The
next page has plenty of options for setting up your time signature. You
can select one of the common ones listed, or set up a custom time signature.
The Beam and Rest Groups... button gives you even more
flexibility. Would you like that 7/8 time to grouped as 4+3 or 3+4 or
2+3+2? Endless possibilities. Lastly, you can setup a pick-up beat (or
anacrusis, as some more proper folks like to say) to start your
piece. The
next page has plenty of options for setting up your time signature. You
can select one of the common ones listed, or set up a custom time signature.
The Beam and Rest Groups... button gives you even more
flexibility. Would you like that 7/8 time to grouped as 4+3 or 3+4 or
2+3+2? Endless possibilities. Lastly, you can setup a pick-up beat (or
anacrusis, as some more proper folks like to say) to start your
piece.
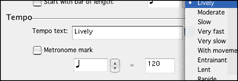 At
the bottom is a section to setup you tempo. If you click on the up-down
arrow to the right of the Tempo text box, you will see
a menu of common terms to start your piece off. If you prefer to give
more precise directions, check the Metronome mark option
and enter the BPM for the note value of your choice. At
the bottom is a section to setup you tempo. If you click on the up-down
arrow to the right of the Tempo text box, you will see
a menu of common terms to start your piece off. If you prefer to give
more precise directions, check the Metronome mark option
and enter the BPM for the note value of your choice.
 Click Next>.
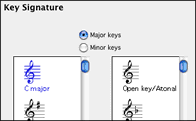
On this page, you can setup the key signature for your piece. Choose
one of the 12 options. Notice there is also an option between Major
keys and
Minor keys. This is simply for your reference when selecting
the number of sharps or flats. Sibelius doesn't actual keep track of
the difference
(as far as I can tell). Click Next>.
On this page, you can setup the key signature for your piece. Choose
one of the 12 options. Notice there is also an option between Major
keys and
Minor keys. This is simply for your reference when selecting
the number of sharps or flats. Sibelius doesn't actual keep track of
the difference
(as far as I can tell).
 Click Next>.
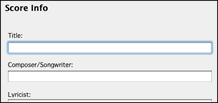
The "Score Info" page lets you enter information about your
piece such as the title and composer. This will be used in several places
so it
is a good idea not to leave these blank. The most noticeable place you
will see this information displayed is at the top of the page. If you
change your mind about the title later, don't worry. It is very easy
to change. This
is
the
final setup page, so when you are done, you will click
the Finish button. Click Next>.
The "Score Info" page lets you enter information about your
piece such as the title and composer. This will be used in several places
so it
is a good idea not to leave these blank. The most noticeable place you
will see this information displayed is at the top of the page. If you
change your mind about the title later, don't worry. It is very easy
to change. This
is
the
final setup page, so when you are done, you will click
the Finish button.

You should see a new window appear on the desktop. The score will have
all of the attributes that you added during the previous setup process.
There should also be two floating palettes that will help you work
on your score.
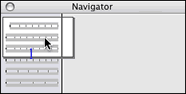 The
first of these is called the Navigator. Should this
window disappear, it can be opened again by going to the Window menu
and clicking on the option for the Navigator. You may
have noticed that you can only see part of your score in the main window,
because score page
are too large to be displayed in the window all at once.
The
Navigator
provides a means of controlling what part of the score is displayed.
In the window, a miniature version of the score is displayed with a rectangle
on top to represent the portion being viewed in the main window. If you
click and drag the rectangle, you will notice that display in the main
window changes in response to this. This enables you to control what
you see in the main window. The
first of these is called the Navigator. Should this
window disappear, it can be opened again by going to the Window menu
and clicking on the option for the Navigator. You may
have noticed that you can only see part of your score in the main window,
because score page
are too large to be displayed in the window all at once.
The
Navigator
provides a means of controlling what part of the score is displayed.
In the window, a miniature version of the score is displayed with a rectangle
on top to represent the portion being viewed in the main window. If you
click and drag the rectangle, you will notice that display in the main
window changes in response to this. This enables you to control what
you see in the main window.
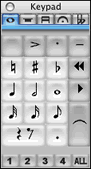 Next
is the Keypad. This window acts as a palette that you
can click on to add elements to your score. Should this
window disappear, it can be opened again by going to the Window menu
and clicking on the option for the Keypad. Notice
the tabs at the top of this window. It defaults to the first one, where
the most common elements (including note values) are contained. Take
a minute to click through the other options and you will see that their
are plenty of other elements available to you (including bowings, accents
and quarter-sharp markings). You will also notice that this palette
has a layout similar to the one on the number keypad of your computer
keyboard (on the right end). This is because each element corresponds
to a key on that area of the keyboard. You can change between options
more
quickly
by
learning
to use this part of your keyboard. Next
is the Keypad. This window acts as a palette that you
can click on to add elements to your score. Should this
window disappear, it can be opened again by going to the Window menu
and clicking on the option for the Keypad. Notice
the tabs at the top of this window. It defaults to the first one, where
the most common elements (including note values) are contained. Take
a minute to click through the other options and you will see that their
are plenty of other elements available to you (including bowings, accents
and quarter-sharp markings). You will also notice that this palette
has a layout similar to the one on the number keypad of your computer
keyboard (on the right end). This is because each element corresponds
to a key on that area of the keyboard. You can change between options
more
quickly
by
learning
to use this part of your keyboard.
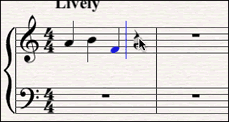 You
can begin entering notes with the mouse, by clicking on the first measure
and then pressing
"N" on your keyboard. Choose a rhythmic duration either with
the mouse or the keypad and then click to place it on the staff. If you
do
not
change the duration before placing the next note, Sibelius will continue
using the same value until you specify another. You
can begin entering notes with the mouse, by clicking on the first measure
and then pressing
"N" on your keyboard. Choose a rhythmic duration either with
the mouse or the keypad and then click to place it on the staff. If you
do
not
change the duration before placing the next note, Sibelius will continue
using the same value until you specify another.
As the notes are added,
you will see the blue cursor move to the next beat.
This lets
you know where you are in the piece. If you need to back up and correct
a note, use the left and right arrow keys to toggle back and forth
among the notes. The blue highlighted note represents the current selection.
You can raise and lower its pitch by using the up and down arrow keys.
Notice that the keypad displays the duration of the current note. You
can change a duration by choosing another value when a note is selected.
This should get you started using Sibelius for your music notation needs.
It has a fair number of options to add elements to the score. They are
far too numerous for me to document completely, so look through the options
in the Notes, Create and Layout menus
to see what is available. They are very well organized and should make
things easy to find. Have fun composing your score!
|