|
More Dreamweaver So now that you have your web page started, you probably want to do a bit more than just format your text. One of the things that makes web browsing unique is the ability to create links that lead to other sites and pages. In this way, you can let the visitor control the information flow and allow him or her to take their own path across the web. Links are typically associated with some text, so first pick a word or phrase from your text that you would like to turn into a link. Since this tutorial focuses on web design, I am going to create links related to this topic in my example. So if I the type words.. HTML JavaScript Flash It isn't much to look at and isn't very useful. So, I return to the formatting palette at the bottom of the screen, which you'll recall looks like this...
Notice the text in the second line that says Link. First highlight your text in the design area and then type the address you would like it to link to in the Link option. Above, you'll see that I am linking to a page on a site called webmonkey.wired.com for my text, but you can type in the URL for any site. Repeat this process for any other text you would like to function as a link. So now my page says... Next to the Link option, you will see an option called Target. This allows you to open web page you are linking to in a new browser window without replacing your web page. To see what I mean, click on the link for Flash above. Notice that the link opens a new window before loading a page. Try either of the first two links (don't forget to come back!) and see how they replace the current web page in this window. In order to change this behavior, while you have your link text selected, click on the blue arrows after the Target text area. Choose the first option, which should say "_blank". Your link will now open in a new window. So far we have only been working with text in paragraphs. There are times when you just need to make a list. HTML provides two ways of displaying such lists, ordered and unordered. The names should be self-explanitory. The buttons for these are located just after the Target areain the Property Panel, with the ordered one displaying numbers. Start in a blank area of your web page and then click one of the two (it should remain darkened). When you start typing, the text should come after the bullet point. Each time you hit return, a new item will be started. To finish and go back to paragraph formatting, hit return one last time and click the button again. So now you can create lists like this... ...or this... HTML also allows you to make tables for data. You can insert one into your web page by going to the Insert menu and choosing the Table option. You will then see new window asking you to make a few decisions about your table, like this...
Briefly, the rows and columns set the dimensions of you table. The width is how much of the page your table should take up. Border will place a border around the table as wide as the number of pixels you specify. Cell padding and spacing affect how spread out the cells of your table are. Once you finish press OK and the table will be inserted in your document. Click on a cell to enter text. Play around with this to see how you might use it and see if you can come up with something like this...
The last thing we will cover is the process of placing images in you web page. First, make sure that you have saved your page and that you know where it is located. The image could be of anything. There are two graphics file formats that are used primarily on the web: GIF and JPEG. Both formats compress an image so that the file size is not as big and it therefore downloads more quickly. Which one you should use depends on the type of image, so you should get familiar with the differences between them.
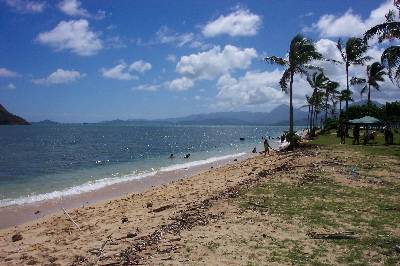
Once it is saved in your folder, go back into Dreamweaver. Go to the Insert menu and select the Image option. Once you select the picture from your folder and click OK, it should be placed within the document where ever the cursor was previously. As a side note, this brings up several copyright issues. You should not take pictures from a web page without permission, because you are likely violating the owner's copyright. I am showing you this feature as an educational excercise. Obviously, for this picture I am granting permission to my students to use the above picture on which I own the copyright (I took the picture myself). There are a lot of myths out there about copyright, so make sure you know the facts before committing a possible violation. If you click on the image you will see that the format palette has changed to look something like this...
You can change things such as the width and height, turn it into a link for a URL, effect its alignment, even place a border around it. One thing that you should do is type a description into the Alt field. This text will be displayed should your image fail to load (which can happen for various reasons). The text also serves to describe the picture for visually-impaired visitors. Using these techniques with those you learned in the last class, you should have a lot of things to add to your web page. Start off by keeping it simple (1 web page), but gradually you may wish to expand your web site with multiple files that link to one another. This expansion is made much simpler if all your files are in a single folder. This allows you to refer to other pages without all the server info at the beginning of each link. To link to another web page in the same folder as your current
one, simply type its filename
into the Link option of the Properties Panel.
When the user clicks on this link, the browser will search the current
folder for it. For instance, if I wanted to refer you back
to the
first
Dreamweaver tutorial, all I have to put in the link field is Well, you now know how to create some of the most common HTML elements, so it's time to get to work. Have fun building your web page!
|

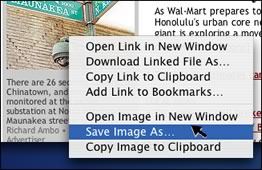 You
may not realize it, but when you are browsing the 'net you have the power
to save any pictures you find. Simply ctrl-click on the image (or right-click
with your PC) and a contextual menu will pop up. One of the options in that
menu should sound like "Save Image..." (it varies between platforms
and browsers). Select this option and you will be asked where to save it.
Try this out with the following image and save it to the same folder as your
web page...
You
may not realize it, but when you are browsing the 'net you have the power
to save any pictures you find. Simply ctrl-click on the image (or right-click
with your PC) and a contextual menu will pop up. One of the options in that
menu should sound like "Save Image..." (it varies between platforms
and browsers). Select this option and you will be asked where to save it.
Try this out with the following image and save it to the same folder as your
web page...