|
Basic Editing in ProTools
 This tutorial will introduce
some of the editing features available in ProTools. It assumes that you have
a basic understanding of ProTools and already have a session with audio recorded.
The setup used for the tutorial was ProTools
M-Powered Academic and the FastTrack
USB audio interface. To get started, open up your existing session. This tutorial will introduce
some of the editing features available in ProTools. It assumes that you have
a basic understanding of ProTools and already have a session with audio recorded.
The setup used for the tutorial was ProTools
M-Powered Academic and the FastTrack
USB audio interface. To get started, open up your existing session.
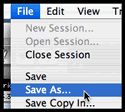 Once
your open the session, it is a good idea to go to the menu
and choose the option. Type in a new
name (although it doesn't have to be drastically different). This is a good
habit to get into. At each major phase of your project, you should save a new
version. This will allow you to go back should you decide you no longer like
the direction things are heading. Because ProTools keeps the audio files separate
from your session file, the amount of hard drive space required to do this
is minimal. Once
your open the session, it is a good idea to go to the menu
and choose the option. Type in a new
name (although it doesn't have to be drastically different). This is a good
habit to get into. At each major phase of your project, you should save a new
version. This will allow you to go back should you decide you no longer like
the direction things are heading. Because ProTools keeps the audio files separate
from your session file, the amount of hard drive space required to do this
is minimal.
 This tutorial will focus on the edit window, so
go ahead and bring this window the front and maximize it. To do this on the
Mac, click on the green button in the upper left corner of the window. This tutorial will focus on the edit window, so
go ahead and bring this window the front and maximize it. To do this on the
Mac, click on the green button in the upper left corner of the window.
 The
next thing you should do to better manage your session resources, is give your
tracks descriptive names. If you did not do this before recording, your tracks
probably have generic names like "audio 1" and "audio 2". If you double click
on the track name, you will see the following dialog window appear: The
next thing you should do to better manage your session resources, is give your
tracks descriptive names. If you did not do this before recording, your tracks
probably have generic names like "audio 1" and "audio 2". If you double click
on the track name, you will see the following dialog window appear:
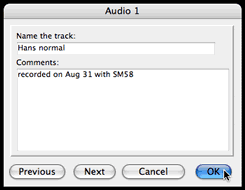
Type in a new name for the track that tells you something about the audio
found there. Also, take advantage of the comments section to include additional
notes about the recording. When you are done click .
My advice would be to do this for all of your tracks.
 Now
you will notice that this did not change the names associated with the
regions of audio present in each track. These still
say something like "audio 1_01". This is because ProTools names the regions
at the time of recording based on the name of the track. This is a good reason
why you should name your tracks before starting to record, however it can be
fixed. Now
you will notice that this did not change the names associated with the
regions of audio present in each track. These still
say something like "audio 1_01". This is because ProTools names the regions
at the time of recording based on the name of the track. This is a good reason
why you should name your tracks before starting to record, however it can be
fixed.
 First
you have to choose the grabber
tool. I'll explain the different editing
tools in more detail a little later in the tutorial, but for now just click
on the hand. Next, hold down the Apple key while
you double click on the region name. This will bring up the following dialog: First
you have to choose the grabber
tool. I'll explain the different editing
tools in more detail a little later in the tutorial, but for now just click
on the hand. Next, hold down the Apple key while
you double click on the region name. This will bring up the following dialog:
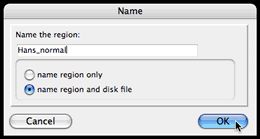
Enter a name here. You also have the option of naming just the region or also
naming the associated file on the hard disk. I recommend renaming both in case
you ever need to use the file outside of ProTools. When you are done click
.
If you have a lot of tracks and regions,
you have to repeat this process a couple of times to rename everything. Again,
if you name your tracks before recording the regions will automatically use
that name. You can therefore save some of this work by naming your tracks as
you record them.
 Above
the tracks you should have noticed a several horizontal lines with numbered
markings at regular intervals along the timeline. These are known as rulers in
ProTools. Along the left hand side you will notice a description of the type
of ruler being display on this line. Some of these will be more useful than
others depending on the type of project. Above
the tracks you should have noticed a several horizontal lines with numbered
markings at regular intervals along the timeline. These are known as rulers in
ProTools. Along the left hand side you will notice a description of the type
of ruler being display on this line. Some of these will be more useful than
others depending on the type of project.
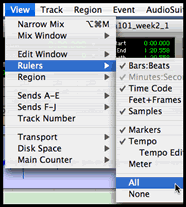 The
one highlighted in blue is your primary ruler. ProTools used this unit of measurement
for various functions. You can change this easily by clicking one of the other
descriptions. If you decide that you do not want seven rulers showing and would
like to free up some screen real estate, you can hide them by visiting the
menu. Here you will find the submenu
where you can uncheck the various ruler units to hide them. If you would like
to hide all but your primary ruler quickly, just choose the option. The
one highlighted in blue is your primary ruler. ProTools used this unit of measurement
for various functions. You can change this easily by clicking one of the other
descriptions. If you decide that you do not want seven rulers showing and would
like to free up some screen real estate, you can hide them by visiting the
menu. Here you will find the submenu
where you can uncheck the various ruler units to hide them. If you would like
to hide all but your primary ruler quickly, just choose the option.
 Now
lets look at some of the tools you have at your disposal in the edit window.
Across the top of the window you will see many of the controls for these tools.
Toward the left is a cluster of arrows that control zooming.
The arrows that point left and right control zooming on the horizontal axis
or timeline, while the first set of up and down arrows control zooming on the
vertical or amplitude axis. Try these out and note how the display changes.
Note these are not changing the sound at all, they simply adjust what level
of detail you are seeing. The ruler at the top of the timeline should update
with new scaling information as well. Now
lets look at some of the tools you have at your disposal in the edit window.
Across the top of the window you will see many of the controls for these tools.
Toward the left is a cluster of arrows that control zooming.
The arrows that point left and right control zooming on the horizontal axis
or timeline, while the first set of up and down arrows control zooming on the
vertical or amplitude axis. Try these out and note how the display changes.
Note these are not changing the sound at all, they simply adjust what level
of detail you are seeing. The ruler at the top of the timeline should update
with new scaling information as well.
To the right of the zoom controls are buttons for accessing the edit tools.
The tool that is currently in use will be highlighted in blue. The following
are a brief descriptions of what each one does:

- Zoom er tool - Allows you to click and drag
like you would when making a selection. Once the mouse has been released,
the display will zoom in so that the selection fills the visible timeline.
- Trim tool - Enables you to click and drag the
ends of regions, thereby trimming the amount of audio that is played in the
timeline. Useful if you only want to hear specific portion of your recorded
audio. Also has a second mode that will compress or expand the audio to fit
in the allotted time instead of trimming.
- Selector tool - Provides the typical click and
drag functionality to make selections within the timeline. Selections
are usually made to perform some other action such as copying or processing
a segment of audio.
- Grabber tool - Allows you to adjust the placement
of a region in the timeline by clicking and dragging. Use this when you want
a specific sound to come in earlier or later.
- Scrubber tool - The "scrub" behavior will play
the audio under the cursor when you click and drag the mouse over a given
region. A good way to use the aid of your ears when searching for a specific
moment in the audio.
- Pencil tool - Enables you to draw or redraw
certain types of data in the timeline. If you zoom all the way in on an audio
region, you can use this tool to repair (or otherwise alter) audio waveforms.
 Let's
do a simple exercise to demonstrate how we can manipulate the audio in our
tracks. Start by soloing one
of tracks in your edit window. You can do this clicking on the button with
an S a the beginning of the track. When we solo a track, ProTools will play
only that track and effectively mute the others. You may think of soloing as
a kind of inverse function to muting. Note however that in ProTools, if both
the solo and mute buttons on a track are enabled, the mute overrides the solo. Let's
do a simple exercise to demonstrate how we can manipulate the audio in our
tracks. Start by soloing one
of tracks in your edit window. You can do this clicking on the button with
an S a the beginning of the track. When we solo a track, ProTools will play
only that track and effectively mute the others. You may think of soloing as
a kind of inverse function to muting. Note however that in ProTools, if both
the solo and mute buttons on a track are enabled, the mute overrides the solo.
Next, choose the scrubber tool. Click and drag the cursor back and forth along
the region and listen to the results. This should help clarify what I meant
earlier by scrub.
Find a part that is particularly interesting (such as a single word) and run
the cursor back and forth at different speeds. When you are done, release the
mouse button.
 Now
choose the zoom er tool. Click and drag over your "interesting part".
When you release the mouse, it should expand to fill the timeline. Switch back
to the scrubber tool and run over the timeline again. You should be able to
hear the constituent parts of the expanded whole. Now
choose the zoom er tool. Click and drag over your "interesting part".
When you release the mouse, it should expand to fill the timeline. Switch back
to the scrubber tool and run over the timeline again. You should be able to
hear the constituent parts of the expanded whole.
Switch to the selector tool and use it to click and drag, selecting part of
the whole. If you are working with speech, try selecting the sound of single
letter (such as "p" or "t"). Once you have made your selection, press the play
button on the transport window. Notice that ProTools now plays only your selection
instead of the whole track.
When making selections, you need to protect against the creation of clicks
at the beginning and end of your selection, known as sample
discontinuities. You can do this by beginning and ending your selection
at a zero crossing, where the amplitude crosses
the center line. In order to see these, it may be necessary to increase the vertical
zoom.
Your selection will look like one of these:
good |
|
poor |
 |
|
 |
The one on the left should not produce clicks as it starts or stops playing.
The one on the right is very likely to produce clicks when it both when it
starts playing and stops. 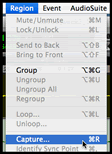 You should get in the good habit of starting and
stopping your selection at zero crossings. Unfortunately ProTools doesn't do
this for you automatically, so developing this habit now will avoid many
problems as you continue to use ProTools for editing audio. You should get in the good habit of starting and
stopping your selection at zero crossings. Unfortunately ProTools doesn't do
this for you automatically, so developing this habit now will avoid many
problems as you continue to use ProTools for editing audio.
After you have fixed your selection to begin and end at zero crossings, you
can capture your selection for later recall. The
capture is a means of organizing your selections so that they can be easily
reassembled in new and interesting sequencing. To do this, go to the menu
and select the option.
This will bring up the following dialog window:
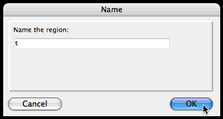
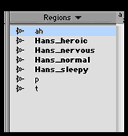 ProTools
will store your selection information into a new region and add it to the Regions
List that you see on the right side of the edit window. Repeat this
process a few times to capture several distinct small regions (if you were
working with speech, try capturing some additional letter sounds). As you add
multiple captured regions to the list, you will notice that they are not in
bold like the regions representing your original recordings. ProTools does
this to distinguish regions that represent whole recorded files from
those that do not. ProTools
will store your selection information into a new region and add it to the Regions
List that you see on the right side of the edit window. Repeat this
process a few times to capture several distinct small regions (if you were
working with speech, try capturing some additional letter sounds). As you add
multiple captured regions to the list, you will notice that they are not in
bold like the regions representing your original recordings. ProTools does
this to distinguish regions that represent whole recorded files from
those that do not.
Once
you have built up a list of regions for yourself, you are ready to try your
hand at assembling them to form new sequences or sounds. To start, create a
new track and solo its
audio. Then switch to the grabber tool.
 At
this point, you'll also need to pay closer attention to the four edit modes
found in the upper left corner of the edit window. These affect how the regions
will behave as you arrange and move them on a given track. Briefly, with keyboard
shortcuts in parentheses... At
this point, you'll also need to pay closer attention to the four edit modes
found in the upper left corner of the edit window. These affect how the regions
will behave as you arrange and move them on a given track. Briefly, with keyboard
shortcuts in parentheses...
- Shuffle mode (F1) causes regions to butt
up against each other as you add them to a track.
- Slip mode (F2) will allow you to place regions
freely at any point along the timeline.
- Spot mode (F3) is used to enter a specific time
for placing your region.
- Grid mode (F4) will only place regions at unit
increments used by the ruler.
 Start
by choosing shuffle mode. Then drag and drop some of your newly captured regions
from the regions list onto the track. Note that they are automatically placed
side by side in the track for you. In this mode it is impossible to overlap
regions or create silence between them. The upside is that it make stringing
your regions together very fast and easy. Start
by choosing shuffle mode. Then drag and drop some of your newly captured regions
from the regions list onto the track. Note that they are automatically placed
side by side in the track for you. In this mode it is impossible to overlap
regions or create silence between them. The upside is that it make stringing
your regions together very fast and easy.
Try switching to slip mode. Now when you drag and drop regions from the
list to a track, you will be able to space them out. You can also grab regions
that are already on the track and adjust their position in the timeline. By
switching back and forth between these two modes, it should fairly straightforward
to do something like this...

The other two edit modes are a bit more specialized in there
application. Spot mode is very handy for video applications when
a sound needs to be placed at an exact time to synchronize with a visual event.
Grid mode is useful for music, when coupled with a ruler that displays rythmic
information such as bars and beats. Feel free to try these out on your own.
To summarize: this tutorial focused on the edit window within
ProTools and introduced many of the tools used for editing and arranging audio
clips. It covered how to organize your tracks and regions by giving them descriptive
names and capturing smaller selections to make new regions. Finally, it showed
how you can use the regions list to access available regions and sequence them
within a track. There is a lot you can do with the editing tools provided by
ProTools, but there is more to come.
|  Once
your open the session, it is a good idea to go to the
  The
next thing you should do to better manage your session resources, is give your

 Now
you will notice that this did not change the names associated with the

 Above
the tracks you should have noticed a several horizontal lines with numbered
markings at regular intervals along the
  The
one highlighted in blue is your primary ruler. ProTools used this unit of measurement
for various functions. You can change this easily by clicking one of the other
descriptions. If you decide that you do not want seven rulers showing and would
like to free up some screen real estate, you can hide them by visiting the


 Now
choose the zoom er tool. Click and drag over your "interesting part".
When you release the mouse, it should expand to fill the timeline. Switch back
to the scrubber tool and run over the timeline again. You should be able to
hear the constituent parts of the expanded whole.

 You should get in the good habit of starting and
stopping your selection at zero crossings. Unfortunately ProTools doesn't do
this for you automatically, so developing this habit now will avoid many
problems as you continue to use ProTools for editing audio.
 ProTools
will store your selection information into a new region and add it to the
  At
this point, you'll also need to pay closer attention to the four edit modes
found in the upper left corner of the edit window. These affect how the regions
will behave as you arrange and move them on a given track. Briefly, with keyboard
shortcuts in parentheses...
 Start
by choosing shuffle mode. Then drag and drop some of your newly captured regions
from the regions list onto the track. Note that they are automatically placed
side by side in the track for you. In this mode it is impossible to overlap
regions or create silence between them. The upside is that it make stringing
your regions together very fast and easy.