|
Recording Audio into ProTools
 This
tutorial will provide you with simple directions on how to get audio recorded
into ProTools.
It assumes that you have a basic understanding of the Mac OS. The tutorial also
assumes that you are using ProTools
M-Powered Academic and the FastTrack
USB audio interface. It does not assume you have any prior knowledge of
the software and therfore takes the time to introduce you to some key features
and common terms. To get started, click on the ProTools icon in the dock. This
tutorial will provide you with simple directions on how to get audio recorded
into ProTools.
It assumes that you have a basic understanding of the Mac OS. The tutorial also
assumes that you are using ProTools
M-Powered Academic and the FastTrack
USB audio interface. It does not assume you have any prior knowledge of
the software and therfore takes the time to introduce you to some key features
and common terms. To get started, click on the ProTools icon in the dock.
 After
the initial startup splash screen, you may be surprised to see very little.
Files in ProTools are called sessions
and ProTools
does not open one for you automatically, you must create it. To do this go
to the the menu and choose the option. You may also wish to simply type Apple
N. After this, the following dialog will appear: After
the initial startup splash screen, you may be surprised to see very little.
Files in ProTools are called sessions
and ProTools
does not open one for you automatically, you must create it. To do this go
to the the menu and choose the option. You may also wish to simply type Apple
N. After this, the following dialog will appear:
Give your session a unique name in the text
field and make sure that
menu is set to the hard drive you wish
to save on. DO NOT save to the desktop.
Notice the at the bottom.
These relate to the types of sound files that ProTools will use for your session.
For now it is fine to use the defaults, but be aware of the benefits
that increased
sample rate and bit depth provide.
 Click
on the button. ProTools will set
up your session for you and open a few new windows. Briefly, let me point out
the file and folder structure that ProTools uses. If you make your way back
to the Finder and browse the hard drive where your project was saved, you will
see a folder with the name you typed into the dialog box. If you double click
on the folder, you will see items like the following in the Finder window: Click
on the button. ProTools will set
up your session for you and open a few new windows. Briefly, let me point out
the file and folder structure that ProTools uses. If you make your way back
to the Finder and browse the hard drive where your project was saved, you will
see a folder with the name you typed into the dialog box. If you double click
on the folder, you will see items like the following in the Finder window:
Note the folders and files found here. All of them are necessary for your
session to function properly, so when moving your session to another disk or
backing it up to a CD, be sure to move the whole folder. The file that ends
with a "ptf" extension is the main file and when double-clicked will open your
session in ProTools. However, if it does not find the related files nearby
errors will occur in your session.
 If
you left ProTools, bring it back to the foreground by clicking its icon in
the Dock. Before I explain what all these windows do, you should first create
a few tracks for handling your audio. Do this by
going to the menu
and choosing the option. This will bring
up a dialog box asking how many and what type of track you would like to create.
It looks like this: If
you left ProTools, bring it back to the foreground by clicking its icon in
the Dock. Before I explain what all these windows do, you should first create
a few tracks for handling your audio. Do this by
going to the menu
and choosing the option. This will bring
up a dialog box asking how many and what type of track you would like to create.
It looks like this:

The default options for one mono audio track will be sufficient for now, so
go ahead and click . Now lets look at
those windows. ProTools has two main windows that you will be working with.
The first of these is the Edit Window which
looks like this:
 This displays the audio information on each track. Time is displayed from
left to right with a number of different units of measurement across the top.
The tools and editing options can be found across the toolbar at the top. We'll
get to these in future tutorials, but for now focus on the track in the middle
entitled "Audio 1". This displays the audio information on each track. Time is displayed from
left to right with a number of different units of measurement across the top.
The tools and editing options can be found across the toolbar at the top. We'll
get to these in future tutorials, but for now focus on the track in the middle
entitled "Audio 1".
The second main window is know as the Mix Window as
seen on the right. This provides you with a number of mixing and processing
options just like an actual mixer might. Each column represents a single channel
and provides control over the level, panning, processing and muting.
Again, we'll learn more in future tutorials.
One smaller window that deserves some attention is the Transport,
which looks like this:
If the buttons here remind you of a tape or CD player, you're thinking correctly.
This is used to Start, Stop, Rewind, Fast Forward and Record. It is a small
window, but don't lose track of it. You will be using it constantly.
To start recording, we will need to first connect our microphone the audio
interface. On the front you will notice three knobs:
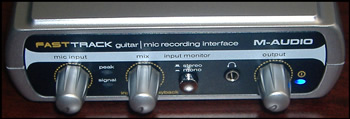
 These
control the mic level, mix and output level respectively. You should start
with all of them turned to the left. You are then ready to connect your microphone.
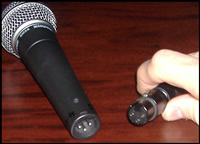
To do this, you will need an XLR cable. These cables have a distinct connector
on each end that makes it impossible to connect them the wrong way. The two
ends are frequently identified by there gender. Take the female end of the
XLR cable and connect it to the microphone as you see in the photo on the
left. These
control the mic level, mix and output level respectively. You should start
with all of them turned to the left. You are then ready to connect your microphone.
To do this, you will need an XLR cable. These cables have a distinct connector
on each end that makes it impossible to connect them the wrong way. The two
ends are frequently identified by there gender. Take the female end of the
XLR cable and connect it to the microphone as you see in the photo on the
left.
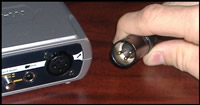 Next
take the male end and connect it to the back of the FastTrack interface to
the port with the little microphone icon next to it. Turn it back around and
plug your headphones into the front for monitoring the sound. You will want
to turn the output level up to about 12 o'clock for a good starting level. Next
take the male end and connect it to the back of the FastTrack interface to
the port with the little microphone icon next to it. Turn it back around and
plug your headphones into the front for monitoring the sound. You will want
to turn the output level up to about 12 o'clock for a good starting level.
 Now
that your microphone is connected, the next step is to prepare ProTools for
recording. First, you will need to record enable your
audio track. To do this, go to the mix window and click on the button marked
with an R. The button should turn red. Second, you should slowly turn up the
knob marked "mic input" on the front of the FastTrack while speaking into the
microphone. You will notice the level meter on
the track in the mix window moving up and down as you talk. Now
that your microphone is connected, the next step is to prepare ProTools for
recording. First, you will need to record enable your
audio track. To do this, go to the mix window and click on the button marked
with an R. The button should turn red. Second, you should slowly turn up the
knob marked "mic input" on the front of the FastTrack while speaking into the
microphone. You will notice the level meter on
the track in the mix window moving up and down as you talk.
 Continue turning the knob up until you see a strong signal. This is observed
when the meter is moving close to the top without actually hitting the top.
At the top of the meter is a dot known as a clip
indicator. If you see this turn red, you have your microphone level
up too high. Simply back off of the level knob and click on the red dot to
make it go away. Continue turning the knob up until you see a strong signal. This is observed
when the meter is moving close to the top without actually hitting the top.
At the top of the meter is a dot known as a clip
indicator. If you see this turn red, you have your microphone level
up too high. Simply back off of the level knob and click on the red dot to
make it go away.
This microphone level adjustment should be done independently from setting
your headphone level. Just because the sound is nice and loud in the headphones,
doesn't mean that it is recording at a high enough level. Trust the meters
before your headphones in this case. If after adjusting the mic your headphones
are too loud or too soft, then you can adjust the output level for them.
 Next
you will need to arm your session for recording.
This can be done by clicking on the record button in the Transport window.
Everything is now set for you to record using your microphone. Next
you will need to arm your session for recording.
This can be done by clicking on the record button in the Transport window.
Everything is now set for you to record using your microphone.
 The
last step is to hit the play button. After you do it will turn blue and you
should start making sound for the mic to record. As you do this, you notice
your track in the edit window filling in a visual representation of the sound
like this: The
last step is to hit the play button. After you do it will turn blue and you
should start making sound for the mic to record. As you do this, you notice
your track in the edit window filling in a visual representation of the sound
like this:
 This
is a time versus amplitude rendering of your sound. It will become the graphical
way for you to identify parts of your sound for editing, arranging and manipulation
later. When you are done recording simply click the stop button. This
is a time versus amplitude rendering of your sound. It will become the graphical
way for you to identify parts of your sound for editing, arranging and manipulation
later. When you are done recording simply click the stop button.
Congratulations, you have just recorded your first sounds into ProTools! First
thing you should always do is save by pressing Apple
S, to ensure you don't lose your audio. Next disarm the track by pressing
the R button on the track again. If you are ready to listen to what you just
recorded, you
may first need to turn the mix knob on the FastTrack to the right toward "playback".
Press the rewind button and then play on the transport. You should now hear
your recording play in the headphones.
You can repeat this process many times in a single session. When you are just
starting out, I would recommend that you create additional
new tracks for extra recording takes. There are more advanced ways to handle
this, but for now keep it simple. Then start record process by record
enabling the track and continue from there.
 When
recording extra tracks, you might not want to hear your existing tracks
at the same time. To stop a track from making sound click the mute
button which is marked with an M. Once it turns orange, you will not
hear that track during playback. To reverse the process simply click it again. When
recording extra tracks, you might not want to hear your existing tracks
at the same time. To stop a track from making sound click the mute
button which is marked with an M. Once it turns orange, you will not
hear that track during playback. To reverse the process simply click it again.
To summarize: in this tutorial you have been introduced to the three main
windows in ProTools and several of their interface elements. Future tutorials
will cover more of what these can allow you to do with your audio. We also
learned to connect a microphone and record sound into ProTools. We also looked
at some of the file structure that ProTools uses in saving your session. This
is just the beginning of what ProTools allows you do, so stay tuned for more.
|