|
Basic Processing in ProTools
 This
tutorial provides an introduction to the processing features
available in ProTools. Process in this context can be thought of as a synonym
for "transform". The specific method used to transform the audio is known as
an effect. It is not intended to provide detailed explainations
of each effect, just the methods for applying effects using this software.
The tutorial assumes that you are already familiar with ProTools, have a session
with audio already recorded and that you have
been doing some editing. Let's get started
by opening up the session. This
tutorial provides an introduction to the processing features
available in ProTools. Process in this context can be thought of as a synonym
for "transform". The specific method used to transform the audio is known as
an effect. It is not intended to provide detailed explainations
of each effect, just the methods for applying effects using this software.
The tutorial assumes that you are already familiar with ProTools, have a session
with audio already recorded and that you have
been doing some editing. Let's get started
by opening up the session.
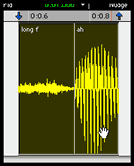 Depending on how extensive your editing was, you probably have a few spots
where regions but up against one another on a given track. Before processing,
it is often desirable to group these regions together so that you can affect
them all in a single pass. The other advantage is that the grouped region will
be added to your region list, enabling you to drag and drop it into your tracks
just like any other region. Depending on how extensive your editing was, you probably have a few spots
where regions but up against one another on a given track. Before processing,
it is often desirable to group these regions together so that you can affect
them all in a single pass. The other advantage is that the grouped region will
be added to your region list, enabling you to drag and drop it into your tracks
just like any other region.
Start
by selecting the tool, then click to select one region of the regions
in your group. 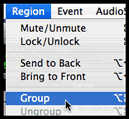 Once you have selected one, hold down the shift key
and continue to click on other regions thereby adding them to your selection.
You can select as many as you would like to join together. Once you have selected one, hold down the shift key
and continue to click on other regions thereby adding them to your selection.
You can select as many as you would like to join together.
Next
go to the menu and choose the option.
ProTools will automatically give the group a name based on the track name.
 Afterward
you will see the new group added to your region list. It will behave just like
any of the other region in the list. This can be very handy if you have assembled
a group of regions that you wish to use multiple times. If you double click
on the namein the region list, a dialog window will appear allowing you to
rename the group with something more descriptive. Afterward
you will see the new group added to your region list. It will behave just like
any of the other region in the list. This can be very handy if you have assembled
a group of regions that you wish to use multiple times. If you double click
on the namein the region list, a dialog window will appear allowing you to
rename the group with something more descriptive.
And the grouping can be reversed
at any time. Simply highlight the group in a track and go to menu
and choose . This will restore the
orginal regions, enabling you to work with them individually again.
 Now
let's look at a few ways to apply processing to this audio. One of the simplest
methods is with the tool.
This tool actually has two modes. The first standard mode
will only remove audio, but the second TCE mode
will use a simple algorithm to actually "stretch" or "shrink" the duration
of a sound (TCE stands for Time Compression and Expansion). To select this
mode click and hold the mouse button on the Trim tool icon at the top of the
edit window. This will reveal a menu to let you choose between these options.
Select the TCE mode. Now
let's look at a few ways to apply processing to this audio. One of the simplest
methods is with the tool.
This tool actually has two modes. The first standard mode
will only remove audio, but the second TCE mode
will use a simple algorithm to actually "stretch" or "shrink" the duration
of a sound (TCE stands for Time Compression and Expansion). To select this
mode click and hold the mouse button on the Trim tool icon at the top of the
edit window. This will reveal a menu to let you choose between these options.
Select the TCE mode.
 You
can now use the mouse to click and drag the ends of your region. This will
automatically affect the duration of the sound. Grab the end and drag it to
the right to make your sound longer. Grab it again and drag it the left to
make your sound shorter. Altering the duration in this manner can be a powerful
tool for manipulating your sound material. You
can now use the mouse to click and drag the ends of your region. This will
automatically affect the duration of the sound. Grab the end and drag it to
the right to make your sound longer. Grab it again and drag it the left to
make your sound shorter. Altering the duration in this manner can be a powerful
tool for manipulating your sound material.
 Each
time you adjust the duration, ProTools will process the region and automatically
replace the original. As a byproduct of this you will notice that a new region
is added to your list each time you change the duration. Also note that the
region name is in bold, which means that ProTools has create a sound file
on the hard drive. Keep this in mind as you use the TCE mode, because it can
quickly cause your project's disk space to balloon. Each
time you adjust the duration, ProTools will process the region and automatically
replace the original. As a byproduct of this you will notice that a new region
is added to your list each time you change the duration. Also note that the
region name is in bold, which means that ProTools has create a sound file
on the hard drive. Keep this in mind as you use the TCE mode, because it can
quickly cause your project's disk space to balloon.
By far the most common way to apply processing to audio in ProTools is via
plug-ins. Each of these small helper programs is
designed to apply a some type of processing to your audio. ProTools M-Powered
comes with over 25 different plug-in and the user can add to this collection
by purchasing additional plug-ins from a variety of companies. After you install
them, they integrate themselves right into the ProTools environment so you
do not have to open other pieces of software to process your audio. There are
several competing formats for plug-in design, but the one used by ProTools
is called AudioSuite.
Plug-ins can usually operate in either real-time or non-real-time mode.
Let's start with non-real-time. In this mode, the plug-in applies it's processing
to a region as fast as the CPU allows, generates a new sound file and uses
it to replace the original in its track. In fact, the TCE trim mode that we
just used is an example of a non-real-time effect.
 To
use other non-real-time processing effects, start by choosing the tool
and use it to click and select a region. Next, go to the menu.
Each item in the various sub-menus represent a unique plug-in, so take
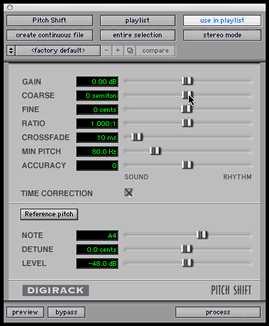
a few moments to look over your options. When your ready, choose the plug-in. A small window will appear that looks like this: To
use other non-real-time processing effects, start by choosing the tool
and use it to click and select a region. Next, go to the menu.
Each item in the various sub-menus represent a unique plug-in, so take
a few moments to look over your options. When your ready, choose the plug-in. A small window will appear that looks like this:

These are your controls over the underlying algorithm. As you may have guessed,
this plug-in can alter the perceived pitch of a sound region. Most of your
adjustments will be made using the slider
(which makes large changes to the pitch) and the slider
(which makes small changes). To move the slider simply click and drag its handle
with the mouse.
 After
making some adjustments to the controls, you can listen to the results by clicking
on the button in the lower left corner.
This lets you hear what your changes will sound like without committing to
them. It does not replace your existing audio in the track and enables you
to make adjustments to your control settings. After
making some adjustments to the controls, you can listen to the results by clicking
on the button in the lower left corner.
This lets you hear what your changes will sound like without committing to
them. It does not replace your existing audio in the track and enables you
to make adjustments to your control settings.
Once you are happy with the settings, click on the button.
ProTools will (in most cases) breifly display a progress bar. Once this disappears
a new processed region will replace the old. Just like with the TCE trim tool,
you will see a new region in your list with its name in bold.
When combined with other
tools in the edit window, processing can yield a large variety of results.
You should explore what some of the other plug-ins are capable of producing.
Using the group function will also help you manage your audio material more
conveniently. The next tutorial will focus more on the features available in
the mix window.
|  Depending on how extensive your editing was, you probably have a few spots
where regions but up against one another on a given track. Before processing,
it is often desirable to group these regions together so that you can affect
them all in a single pass. The other advantage is that the grouped region will
be added to your region list, enabling you to drag and drop it into your tracks
just like any other region.
 Once you have selected one, hold down the
  Afterward
you will see the new group added to your region list. It will behave just like
any of the other region in the list. This can be very handy if you have assembled
a group of regions that you wish to use multiple times. If you double click
on the namein the region list, a dialog window will appear allowing you to
rename the group with something more descriptive.
  Now
let's look at a few ways to apply processing to this audio. One of the simplest
methods is with the
  You
can now use the mouse to click and drag the ends of your region. This will
automatically affect the duration of the sound. Grab the end and drag it to
the right to make your sound longer. Grab it again and drag it the left to
make your sound shorter. Altering the duration in this manner can be a powerful
tool for manipulating your sound material.
  Each
time you adjust the duration, ProTools will process the region and automatically
replace the original. As a byproduct of this you will notice that a new region
is added to your list each time you change the duration. Also note that the
region name is in bold, which means that ProTools has create a sound file
on the hard drive. Keep this in mind as you use the TCE mode, because it can
quickly cause your project's disk space to balloon.
 To
use other non-real-time processing effects, start by choosing the